How to Install Drip Irrigation: For Gardening Enthusiasts and Home Growers

Gardening enthusiasts and home growers have increasingly turned to drip irrigation systems for their watering needs. This efficient method ensures plants receive water directly to their roots, conserving water and promoting healthier growth.
If you’re considering a more sustainable and efficient watering system, this guide will take you through the process of installing a drip irrigation system in your garden or yard.
What is Drip Irrigation?
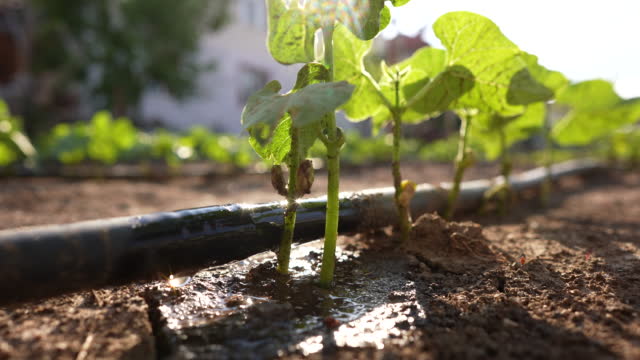
Drip irrigation, also known as trickle irrigation, delivers water slowly and directly to plant roots through a network of tubes, hoses, valves, and emitters. This system minimizes water evaporation and runoff, making it a more eco-friendly and cost-effective solution compared to traditional watering methods.
Benefits of Drip Irrigation
Water Conservation
Delivers water only where needed, reducing wastage.
Reduced Weeds
By only watering desired plants, you prevent weed growth.
Healthier Plants
Direct water supply avoids wetting foliage, reducing disease risks.
Materials You’ll Need
- Drip tubing or hose
- Filter and pressure regulator
- Drip emitters (drippers)
- Tee fittings, connectors, and end caps
- Support stakes
- Hole punch
- Timer (optional)
Step-by-Step Guide on Installing Drip Irrigation
1. Planning
Start by sketching your garden layout. Identify key areas that require watering, such as garden beds, pots, or specific plants. This helps determine the length of tubing you’ll need and the number of emitters.
2. Select Your Water Source
Most systems connect directly to an outdoor faucet. Ensure your chosen faucet is operational and conveniently located for your garden layout.
3. Install Filter and Pressure Regulator
Before connecting your system, install a filter to prevent debris from clogging the emitters. A pressure regulator ensures water is released at an optimal rate.
4. Lay Out the Tubing
Run the main drip tubing around your garden based on your sketch. Keep it as close as possible to plants to minimize the need for additional connectors. Cut the tube with scissors or special tubing cutters.
5. Install Emitters
Using a hole punch, create holes in the tubing where each plant or pot is located. Attach the drip emitters to these holes. Emitters vary in flow rates, so select one best suited to your plants’ needs.
6. Add Connectors
For areas where the main tubing doesn’t reach, use smaller tubing called micro-tubing. Connect this to the main line with tee fittings or connectors.
7. Secure Tubing
Use support stakes at regular intervals to secure the tubing in place and prevent it from moving.
8. Test Your System
Turn on the water and check if all emitters are working correctly. Look for any leaks or clogs and adjust as necessary.
9. Install a Timer (Optional)
To automate the watering process, install a timer. This allows you to set specific days and times for watering, ensuring your plants are hydrated even when you’re not around.
10. Maintenance
Periodically check the system for clogs or damage. Clean emitters and replace any damaged parts to keep the system functioning optimally.
Additional Tips for Drip Irrigation Success
1. Zone Selection
Depending on the variety of plants in your garden, you might have different watering needs. By setting up different zones, you can customize the watering duration and frequency for different plants. For instance, vegetables might need more frequent watering compared to established shrubs or perennials.
2. Monitor Weather Conditions
Adjust your watering schedule based on rainfall and climate conditions. Over-watering is just as detrimental as under-watering. During rainy seasons, you might want to reduce the frequency or even temporarily shut off the system.
3. Expansion
As your garden grows, your drip irrigation system can grow with it. Investing in a modular system or purchasing a little extra tubing can help you expand or modify your system in the future without a complete overhaul.
4. Emitters Variety
Drip emitters come in various types – from soaker hoses that gently ooze water along their length to individual drippers targeting specific plants. Depending on your garden’s needs, you can mix and match to ensure optimal watering.
5. Filtration and Water Quality
If using water from sources like wells or collected rainwater, it’s essential to ensure the water is clean and free from debris. Regularly clean filters and consider additional filtration if you notice frequent clogging.
6. Winter Care
In areas with freezing winter conditions, it’s important to winterize your drip irrigation system. Drain the system completely to avoid any water freezing and damaging the tubing or emitters.
Frequently Asked Questions
Q: How often should I use my drip irrigation system?
A: The frequency depends on the type of plants and soil. For most vegetables in peak summer, daily watering might be required. However, established trees or shrubs might need only weekly watering.
Q: Can I use fertilizers with my drip system?
A: Yes, many gardeners use drip systems for fertilization, a method known as fertigation. Ensure the fertilizer is water-soluble and the system is adequately cleaned post-application to prevent clogging.
Q: How long should each watering session last?
A: It varies based on the plant’s needs, emitter’s output rate, and soil type. Typically, a session lasts between 20 minutes to an hour. Monitor soil moisture to determine the optimal duration.
Conclusion
Understanding the intricacies of a drip line is paramount. When setting up your system, starting from the hose bib is essential. This is where you connect your garden hose, leading to the drip irrigation tubing. Ensuring that the water pressure is apt is pivotal because too much can burst the tubing, while too little won’t distribute water efficiently. With a vast array of drip irrigation components available in the market, selecting the right ones can make all the difference in achieving a thriving garden.
Additionally, gardeners should be wary of contaminated hose water. It’s imperative to have your own vacuum breaker or a backflow preventer in place. These tools are designed to prevent dirty water from flowing back into your clean water supply, ensuring the health of your plants. The choice between drip lines and the integration of a micro sprayer depends on the specific needs of your garden. Making use of tee or elbow connectors allows for a seamless extension, especially when using unperforated tubing for those areas where you don’t need water.
As you walk through your garden, make sure to cover all the exposed tubing with mulch or bury it slightly beneath the soil to shield it from sunlight and potential damage. This not only extends the lifespan of the tubing but also maintains the aesthetic beauty of your garden. Always remember to have a hose adapter on hand, which serves as the bridge between your garden hose and the drip irrigation system, ensuring a smooth and efficient watering experience.


