How to Stain Wood: Step-by-Step Instructions

Staining wood is an art that transforms the ordinary into extraordinary. Whether it’s for a DIY project or professional work, the right staining technique can significantly enhance the beauty and longevity of your wooden items. This article provides a detailed guide on how to stain wood effectively, ensuring a professional finish every time.
What You Need to Know Before Staining Wood
Understanding Wood Types
Different types of wood absorb stain differently. Hardwoods like oak and walnut have a dense grain that takes the stain well, while softer woods like pine can absorb stain unevenly.
Choosing the Right Stain
Stains come in various types, including oil-based, water-based, and gel stains. Each has its benefits and suitable applications.
Preparation is Key
Proper preparation of the wood surface is crucial for a successful staining project. This involves cleaning, sanding, and priming the wood.
Step-by-Step Guide to Staining Wood
1. Prepare the Workspace
Ensure you have a well-ventilated area to work in. Lay down drop cloths to protect the surrounding area from spills.
2. Clean the Wood Surface
Remove any dirt, dust, or grease from the wood. A clean surface allows for even absorption of the stain.
3. Sand the Wood
Sanding smoothens the surface and opens up the pores of the wood for better stain absorption. Start with a coarse sandpaper and gradually move to finer grits.
4. Apply Pre-Stain Wood Conditioner
This is especially important for softwoods. It helps in achieving a uniform stain color.
5. Choose Your Stain
Decide on the type and color of the stain based on your project and wood type. Test the stain on a small, inconspicuous area to ensure it gives the desired color.
6. Apply the Stain
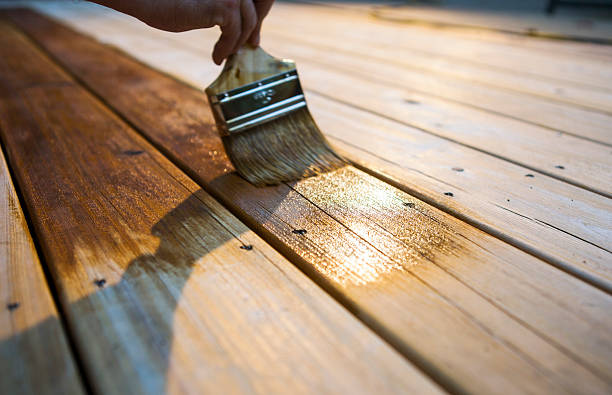
Use a brush or a clean cloth to apply the stain. Work along the grain, and apply the stain evenly.
7. Wipe Off Excess Stain
After a few minutes, wipe off any excess stain with a clean cloth. This prevents blotchiness and ensures a smooth finish.
8. Allow the Stain to Dry
Follow the manufacturer’s instructions for drying time. The drying time can vary depending on the type of stain and environmental conditions.
9. Apply a Finish
Once the stain is dry, apply a clear finish to protect the wood and enhance its appearance. Options include polyurethane, varnish, or lacquer.
Tips for Perfect Wood Staining
1. Always test the stain on a scrap piece or an inconspicuous area.
2. If the first coat of stain appears too light, you can apply a second coat for a darker hue.
3. Use fine-grit sandpaper between coats for an ultra-smooth finish.
4. Be patient and allow ample drying time between coats.
Common Mistakes to Avoid in Wood Staining
1. Skipping sanding and prep work.
2. Not wiping off excess stain, leading to a sticky finish.
3. Rushing the drying process.
4. Applying stain in a poorly ventilated area, leading to uneven drying.
Enhancing Your Staining Technique: Advanced Tips
While the basic steps of staining wood are straightforward, there are advanced techniques and tips that can elevate your project’s quality:
Layering Stains for Depth
For a richer, more complex color, consider layering different stains. Start with a lighter shade and gradually build up to the darker tone.
Distressing for a Vintage Look
To create an antique or weathered look, you can lightly distress the wood before staining. This involves strategically sanding edges and surfaces to mimic wear.
Using Toner or Glaze
After the initial stain, applying a toner or glaze can enhance the color depth and uniformity.
Sealing with the Right Finish
Choose a finish that complements your stain and the use of the wood item. For high-traffic surfaces, a durable finish like polyurethane is ideal.
Regular Maintenance
To keep the stained wood looking its best, regular cleaning and occasional touch-ups are necessary.
Environmental Considerations in Wood Staining
Using eco-friendly stains and considering the environmental impact of your project is increasingly important:
Choose Eco-Friendly Stains
Look for water-based stains or those labeled as low-VOC (Volatile Organic Compounds).
Proper Disposal of Materials
Ensure you dispose of rags, brushes, and leftover stains according to local regulations to prevent environmental contamination.
FAQs
Q: Can you stain wood without sanding?
A: Sanding is recommended for the best results, but there are products like liquid sandpaper that can be used as an alternative in some cases.
Q: How long should stain sit before wiping?
A: This depends on the stain type and desired color depth. Generally, 5-15 minutes is a common range.
Q: Can I mix different stains to get a custom color?
A: Yes, you can mix stains of the same type (e.g., oil-based with oil-based) to achieve a custom color.
Wrap-Up
Achieving a flawless finish in your wood staining project hinges on the intricate balance of technique and the choice of materials. When applying wood stains, always consider the direction of the wood grain for a natural and seamless appearance. Tools like a foam brush or a synthetic bristle brush are essential for even application, while a tack cloth is invaluable for removing dust between coats. Whether you’re working with an oil-based stain or a water-based stain, each type has its unique properties that can accentuate the beauty of wood furniture or other wood projects.
For prepping your wood, medium grit sandpaper is a versatile choice, ensuring the surface is smooth and ready to absorb the stain uniformly. Each type of stain, from gel stain to oil-based stains, imparts a distinct character to your woodwork. A gel stain is ideal for creating a rich, pigmented look, while oil-based stains offer durability and depth, enhancing the inherent beauty of the wood’s grain. When applying these stains, using a lint-free rag can help achieve a smooth, professional finish without leaving any residue.
The choice of stain and application technique greatly influences the final outcome, making your wood project not just a task, but a creative expression. Remember, the key to successful wood staining lies in understanding the nature of your materials and handling them with the care and respect they deserve, ensuring your wood furniture and projects stand the test of time with elegance and style.


