The Essential Guide on How to Strip Paint from Wood

It’s time to bring out the natural beauty hiding under layers of old paint in your wooden furniture or fixtures. Here’s a step-by-step guide on how to strip paint from wood effectively.
When it comes to refurbishing or restoring wooden furniture, one of the most common challenges you’ll face is removing old paint. Perhaps you’ve come across a vintage wooden piece whose natural beauty is obscured by layers of aged, peeling paint, or maybe you just want to revamp a wooden door or window frame in your home. Either way, you’ll find that the task is less daunting than it may initially appear.
What You’ll Need
Before you start, gather these essential tools: a good-quality paint stripper, a paint scraper or putty knife, steel wool or a scrubbing brush, protective gloves, eye protection, and a face mask.
Step 1: Prepare Your Workspace
Choose a well-ventilated area to work in as paint stripper fumes can be harmful. Clear the space of any objects that may be damaged by the stripper, and spread a protective sheet or old newspapers on the floor to catch any drips or debris.
Step 2: Apply the Paint Stripper
Put on your protective gear – gloves, goggles, and a mask. Then, liberally apply a layer of paint stripper onto the painted wood surface using a brush. Ensure that you follow the instructions on the paint stripper container, as the recommended time to let the stripper sit varies between brands. Generally, this will be somewhere between 15-30 minutes.
Step 3: Scrape off the Paint
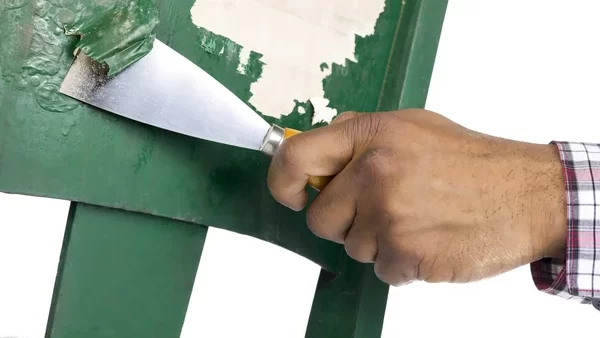
Once the paint starts to bubble and lift from the wood – a sign that the stripper has done its job – you can begin scraping it off with a scraper or putty knife. Do this gently to avoid scratching the wood underneath.
Step 4: Clean the Wood
After you’ve removed as much paint as possible with the scraper, use steel wool or a scrubbing brush to remove any remaining paint residue. Be sure to scrub in the direction of the wood grain to prevent damage.
Step 5: Neutralize the Stripper
Once all the paint is removed, neutralize the paint stripper by following the instructions on its container. This step is essential because if not neutralized, the stripper can continue to eat away at the wood.
Step 6: Sand the Wood
Lastly, smooth out the wood by sanding it down. Start with a coarse-grit sandpaper and then progress to a finer-grit to achieve a smooth, clean finish. Remember to always sand in the direction of the grain.
Step 7: Treat the Wood
After the wood is sanded down, treating it is a vital step. You can opt to stain or seal it, or perhaps paint it a new color. Each option can enhance the wood’s natural beauty in a different way. If you choose to stain the wood, it will bring out the unique features of the grain and give it a more rich, deep color. Sealing the wood will protect it from damage and can also bring out the natural color of the wood.
Step 8: Dispose of the Materials Safely
Remember that materials like old paint chips and used paint stripper can be hazardous. Dispose of these materials safely according to your local waste disposal regulations. Never pour leftover paint stripper down the drain, as it can harm the environment.
Tips and Tricks
For those hard-to-reach spots, a wire brush or a toothbrush can be useful tools. Be careful not to apply too much pressure, though, as you don’t want to damage the wood underneath the paint.
If you’re dealing with multiple layers of paint, you may need to repeat the stripping process a couple of times. Patience is key in achieving a clean and bare wooden surface.
For an eco-friendlier alternative, consider using a heat gun to strip the paint. However, take note that this method requires a higher level of skill and caution to prevent burning the wood or starting a fire.
Revealing the natural beauty of wood underneath layers of paint requires careful work and precision. Here are some additional tips and tricks to ensure you get the best results when you strip paint from wood:
Choosing the Right Stripper
Not all paint strippers are created equal. There are various types, such as solvent, caustic, and biochemical strippers. Solvent-based strippers are usually the most effective, but they can be harsh. Biochemical strippers are less harmful but may require more time and effort. Consider the type of paint you’re dealing with and the kind of wood underneath before choosing your stripper.
Chemical-Free Alternatives
If you prefer to avoid chemicals, a heat gun or infrared paint removal tool can be used to soften the paint, making it easier to scrape off. Do remember, however, to exercise caution as these tools can cause burns or fire if not used properly.
Utilize a Variety of Scrapers
Having a range of scrapers of different sizes and shapes can help you remove paint from various nooks and crannies. A putty knife is good for large, flat areas, while a smaller scraper or even an old toothbrush can help with corners and detailed work.
Preserving Detail
If you’re working with a detailed piece, consider using a soft brass-bristle brush to clean the crevices and intricate designs without damaging them. This approach helps maintain the details that give the piece its unique charm.
Use of Mineral Spirits
After stripping and scraping, a small amount of mineral spirits applied with a fine steel wool pad can help to remove any stubborn paint residue and prepare the wood for sanding.
Test Patch
Especially when working on a large piece, always perform a test patch first. This allows you to gauge how the wood will react to the paint stripper and determine the amount of time you need to leave it on for optimal results.
Sanding
When it comes to sanding, start with a coarse-grit sandpaper to remove any major imperfections or residual paint. Gradually work your way down to a fine-grit sandpaper to achieve a smooth finish. Always sand along the grain of the wood, not against it.
By following these enhanced tips and tricks, you’ll be well on your way to uncovering the hidden beauty of your wooden pieces.
Conclusion
Navigating the process of stripping paint from wood can be complex, especially when dealing with old lead paint or thick layers of paint. Chemical paint strippers are highly effective at penetrating these layers and making the task of removing paint easier. They work by breaking down the structure of the paint, allowing it to be scraped off and reveal the bare wood surface beneath. Yet, if you’re dealing with lead-based paint, always proceed with caution, as lead dust can be harmful if inhaled.
If you prefer a heat-based method, heat guns can be a viable alternative to chemical strippers. They work by producing a stream of hot air that helps soften paint, making it easier to scrape away. However, they must be used with care to avoid the risk of burns or fire. And while they eliminate the need for chemical paint stripper use, the process can be more labor-intensive and time-consuming, especially when dealing with thick layers of paint.
In conclusion, whether you choose to use a paint brush to apply a chemical stripper or prefer the heat method to soften the paint, stripping paint off wood is a task that requires patience and meticulousness. It’s important to remember that both methods have their pros and cons, and the choice between them depends on your personal preference, the type of paint you’re dealing with, and the desired results. Regardless of the method you choose, the reward is a beautifully bare wood surface, ready for refinishing or natural display.


