How To Change A Hanging Light Fixture?
Lighting fixtures can be changed pretty universally, which is a great thing. Your ceiling has the same size lightboxes, and three wires are always connected and disconnected the same way.
If the fixture itself is the right size for the space you’re putting it in, you don’t need to do any research at all. Light fixtures can be purchased anywhere, and you can install them wherever light fixtures already exist in your home.
A ceiling-mounted fixture, such as a pendant light or a chandelier, is installed the same way. It is crucial to assess if the light you have chosen will support the weight of the electric box that houses the wire connections.
The existing box will probably be fine if you replace the light fixture with one about the same weight.
Depending on how much weight the ceiling box can support, it may need to be replaced. You will learn how to hang a light fixture in this guide.
Do I Need To Hire An Electrician To Install A Light Fixture?
When installing a light fixture, as with any other electrical project, it is always advisable to hire a licensed electrician unless you have previous electrical experience.
Lighting replacement is the subject of this article. Installing a fixture in a completely new location where there was never light before is usually the job of licensed electricians.
How To Change A Hanging Light Fixture?
Here are the step by step guide to how to change a hanging light fixture.
1. Turn Off The Power To The Old Fixture
To change out an old fixture, you must first shut off the electrical power at the source. The right switch must be turned on in the correct place on your electrical panel.
As you do this, you’ll be able to discern whether the switch you’ve selected has the right shape when the light shuts off. There are also labels on the panel that should be helpful, but I’ve been disappointed by their accuracy.
2. It Is Necessary To Remove The Canopy In Order To View The Wiring And Fixtures
Covered in a rounded, broadband, the canopy is flush with the ceiling and camouflages the hardware and wiring. Most canopy attachments consist of some kind of screw; just undo the screw and let the canopy fall.
3. Three Wires Need To Be Undone: Black, White, And Copper
You connect three wires from the light fixture to three wires installed in the ceiling when you install a light fixture. Then, you mount the hardware to connect the wires. It’s as simple as that.
To remove the old fixture, you will need to disconnect three sets of wires: black, white, and green (or copper). Separate the fixture wiring from the ceiling wiring by unscrewing the wire connectors (the red parts in the image above).
4. Remove The Old Light Fixture
Generally speaking, you can take out the old fixture after disconnecting the wires. Attaching them to the ceiling or electrical box can take any number of methods, but usually, it’s just one or two screws.
You don’t need to attach it to anchors since your electrical box is already anchored to your ceiling. When it’s a heavy and awkward fixture, it helps if there is another person with you.
5. Complete The Canopy Assembly And The Hanging Hardware
The first step is to turn off the electricity at the electrical panel for the fixture. Verify that the fixture isn’t powered before beginning work with a voltage tester. Electric shock is not prevented by relying on wall switches.
You should also set aside any components you may need to add after the fixture is hung (gloves, glass panels, bulbs, etc.). The fixture should be installed according to the specific instructions. Be sure to slide any wires or chains that need to be covered over the wiring.
Attach a platform to a stepladder with drywall screws and support the fixture close to the ceiling. This provides a good working surface, and you can do the wiring without holding the chandelier in midair due to its proximity to the ceiling.
Using a ladder with two people on it may also be possible but coordinating your movements can be quite challenging.
Most fixtures come with mounting straps – a strip of metal that screws into the junction box. Often, the existing strap can be removed and replaced with the new screw, but you may need to unscrew the old strap and add the new screw.
6. Connect The Wiring
Make sure the supply wires are not frayed or damaged. Remove about 3/4-inch of insulation from the wires, if necessary. Black and white wires are used in newer fixtures.
The bare ends of the black supply wire and black fixture wire should be twisted together, and then a wire nut should be twisted on. You can now repeat the process with white wires. Wires should be tucked carefully into the junction box.
Before Completing The Installation
Check that the connection works and a bulb are installed. It is possible that the wiring on an older fixture is not color-coded when reinstalling it.
- Connect the black supply wire to one of the fixture wires in this case.
- Once the white supply wire is connected to another fixture wire, proceed to the next step.
Hang The Fixture
Install the mounting stem on the ceiling box by threading it through the mounting strap. It is still possible to see the mounting hardware and box even though the fixture has been securely mounted to the ceiling. Cover the mounting hardware with the canopy; then, tighten the locknut against the canopy.
How To Hang Outdoor Lights?
Porches, decks, and sunrooms can be made more dramatic with hanging lights. Although the process is nearly the same, there are a few extra precautions for outdoor lighting.
If you want to light fixtures for outdoor, make sure it is UL-rated. To prevent moisture condensing inside, the inside of the fixture should be made of weather-resistant materials.
A rubber coating on the power switch would protect against shocks. In the space where the fixture is to be installed, measure the distance from the floor to the bottom of the fixture: no less than seven feet is needed.
You’ll be able to see your decor in a whole new light once you know how to hang outdoor lights and how to hang a light fixture indoors.
Optional Step: Install New Bracket
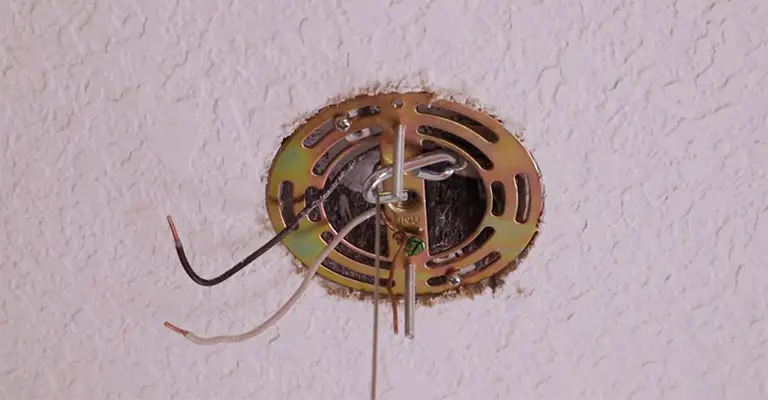
Three electrical wires come out of a universally sized, prewired box in the ceiling in all light fixtures. Mounting hardware for the fixture will be a type of baseplate. A single bar “strap” with an additional “nipple” screw can be used, or an all-encompassing circular bracket can be used instead.
I have replaced a bar strap on each light fixture I’ve replaced because it came with the fixture itself. I have replaced the bar strap with a new mounting bracket. More guidance can be found in the instructions included with your light fixture, but if a bracket is included, use that.
Finally, Restore Power And Test Out The New Fixture!
If the light does not work after restoring power, likely, the wires aren’t fully connected. I have only had to remove the fixture once among the few lights I have installed and inspect the connections and wires.
Conclusion
Replacing a ceiling light fixture may initially seem like a daunting task, but with the right tools and guidance, it becomes manageable. One crucial step is ensuring that the bare copper ground wire is securely connected, as this serves an essential safety function. Always refer to your light fixture instructions to ensure that the grounding wire is attached correctly, often to a green ground screw. Using a wire connector, one must also ensure that the dedicated copper wire coming from the ceiling is appropriately linked with the hanging light fixture’s dedicated copper wire.
It’s also vital to double-check all wires connected before completing the installation. Remember that a loose wire could spell trouble down the line. Once everything is safely and securely connected, you can then install your light bulbs, and enjoy the new ambiance your new hanging light fixtures bring to your space.
In conclusion, changing a hanging light fixture can refresh and transform a room’s atmosphere. By following the correct steps and paying particular attention to the grounding wire and other connections, you ensure a safe and effective transition from your old ceiling fixture to the new. Always keep the provided light fixture instructions close by for a smooth installation process.

